I already showed you how to get a PowerShell in an Azure Functions off the ground. How about we actually use it with some modules that are not included in Azure Functions? This post will explain how to get FTP going and upload a module and how to import that module into your script.
We start at the "Overview" of our Azure Function, it's the same one I created a couple of weeks ago for another post. It looks like this:

Click on "Platform features" and there select "Deployment Center":

This is also new in Azure Functions, it was updated along side the Azure Functions v2. But don't worry, FTP is still here! You might have to scroll on the next screen, because it's at the bottom of the list. At least in my case.

Click in "FTP" and then select "Dashboard" right below it.

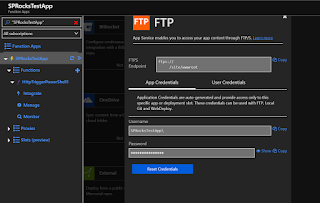
You know have to two options: "App Credentials" or "User Credentials". With "User Credentials" you can create an Azure Functions FTP user, so you can have one FTP account for all your apps. Of course we don't do that. I'm using "App Credentials", because I rarely log into my App with FTPS.The credentials are automatically created and can be reset by a push of a button. You can also see the FTPS endpoint above the credentials.

But you can also check under "Platform features". Click on "Properties" to get a list of information you might need. In our case we only need the "FTP/Deployment User" and the "FTP Host Name":

Now we just connect via Windows Explorer to the FTPS Server. You will see a couple of messages to provide the user and the password.


If you succeeded, you will see a screen like this:

Because I was super smart when creating this test function, I decided not to give it a proper name but instead stick with the default name. The default name is "HTTPTriggerPowerShell1". Open that folder to see "run.ps1" and "function.json". We will place our module in here, somewhere.

You know what? We forgot to get our PowerShell modules! Welp, we have to do that now, I guess. Open your PowerShell window and enter this command:
Save-Module msonline -Repository PSGallery -Path "C:\temp"
. I will store the "MSOnline" module that you have installed on your computer in "C:\temp\MSOnline\VERSIONNUMBER". Like this:

I have multiple version, because over time you have to update your modules in Azure Functions. So I'm collection them by now. Go back to the FTPS in your Windows Explorer and create a new folder called "bin". You can name it whatever you want, "bin" is just an example. I you give the folder a different name, you will have to change the script later on.

Upload the "MSOnline" folder, so it looks like this:

Finally we can import the module in our Azure Function:

And here's the script. You might have to change the folder name "bin", depending on your setting. Also after each change to the module "MSOnline", f. ex. using a newer version, you will have to change the version number in the script. In the example it's called "$MSOLVersion". Also: The function name! Never keep the default names, you will get crazy trying to fix issues. It's fine if you are just testing out a system, but please change the names with descriptive names!